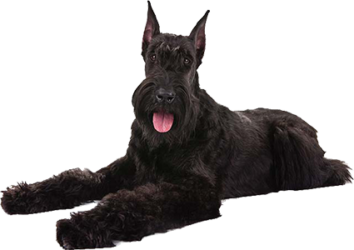
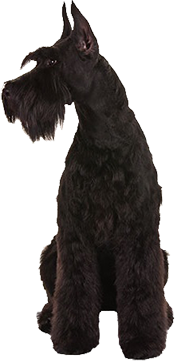
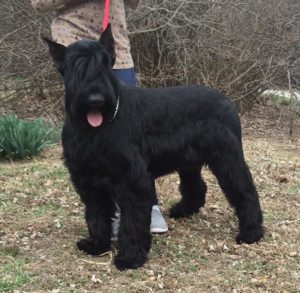
Breeding the drive, size, and muscle you see in a working Giant Schnauzer into a dog that will also excel in AKC conformation, and be of the upmost health and vigor. Yes, you can have it all! Our pups make wonderful family pets, working dogs, and excellent therapy/service dogs. Parents are WORKING DOGS on our FARM. We health test our parents for VWB, THYROID, HIPS and EYES. We also champion title many of our adults in conformation. Breeding for protective nature and drive to work.
Grooming:
Many of the grooming supplies mentioned on this page or in the video such as premium Shampoos and Ear cleaner can be purchased from http://www.lifesabundance.com/petfoods
——————————————————————————————–
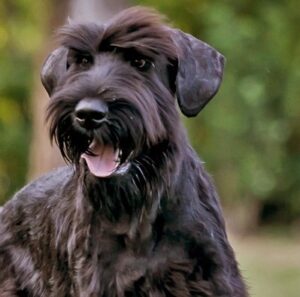
Giant Schnauzer Grooming:
Our pups all come with a grooming before they leave. Pup is bathed in a puppy shampoo or chlor 4 shampoo, brushed out, Ears are cleaned out, sanitary area is cleaned, and nails are trimmed. An 8 wk old puppy will not be shaved in a schnauzer cut, however if your pup is 10 wks of age or older we can clip a schnauzer line on your pup if you like. If winter months you may want to wait and keep puppy full coated for warmth. If cutting back for first puppy cut it is best to leave 1/4 to 1/2 inch on back since puppy’s can be thin coated at this age. Shave to short and it can look bald and chill your pup. If you are going to show your pup in conformation you will need to get some lessons on stripping the coat. I can show you how to strip your pup or how to do a pet Schnauzer cut on your pup if you are local and you bring pup to me.
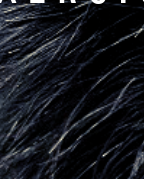
After you have pup: If you are grooming your pup and you notice some thinning of the coat on your growing puppy please don’t worry… This is very normal. Puppies will loose their puppy coats and while they “blow” their coat it can look bare if you clip them short. Once the mature growth starts coming in it will fix itself and look much thicker. In some cases you may have some matting going on at this time if you have not been brushing out the coat weekly. If this is the case you may need to de-mat the coat which would cause even more thinning. You can choose to strip the coat if you like but I prefer just to clipper the coat if your not showing in conformation. Although If you want to get rid of any pesky white hairs here and there the best method is stripping for that. Below is general grooming with clipper method. It is also normal to see white hairs mixed throughout a solid black Schnauzer’s coat. All black Schnauzers have this and some have more than others. Again, stripping or using a coat king grooming brush will minimize the white hairs if you do not like them. Many Giants also have reddish or brownish tones on and off throughout their growing years which can come from many different sources such as food dyes, natural and artificial bleaches and or dyes, or even the sun. The puppy coat is most susceptible to this color but some adults get it as well with most color being in the guard hairs which are stripped away. so you will see less or none if you strip or use a coat king on the coat. It is typically the hairs that are in the process of being dislodged, so it does tend to even go away or lesson on its own with time. If from food dyes or something changing the color of the full coat from within the dog it may not come out fully with stripping or a coat king. If you are showing your dog in conformation your experienced show handler will know tricks of the trade to have the coat looking perfect for the ring.
Examples of whites hairs within a black coat:
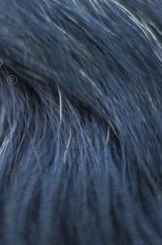
Example of reddish tone you sometimes see in a black coat:
————————————————————————
Things You’ll Need for grooming: Cotton balls, Dog shampoo, Towel, Blow dryer- (NEEDED), Comb, Brush, Cotton Swabs, Scissors, Dog nail trimmer, Nail file. Good pair of Clippers if you are clipping the hair with a # 10 or a #7 blade, and attachments for body longer length cutting. Also keep baking soda on hand just encase you cut the nails to short and they start to bleed. Baking soda helps the bleeding stop and the pain. tweezers to pluck any hair out of ears. Unlike most dog breeds, Schnauzers are low to no shedding. While that means there will not be fur coating the living room couch, it also means routine grooming is important to a Schnauzer’s well-being. Unkempt hair will become knotted, matted and uncomfortable for your pet. Many owners decide to send their Schnauzers to professional groomers because of the skill and time involved. Other owners, however, attempt to do the task themselves. There are a plethora Schnauzer styles out there. Some owners intend to enter their Schnauzer as a show dog in competitions, while others keep them as regular pets. The following tips apply to all types of Schnauzers: Giant, standard, miniature, and toy.
1.Bathe your dog in room-temperature or luke warm water in either a bathtub or large plastic tub. To prevent slipping, a rubber mat can be used. Use dog shampoo, which can be purchased at link above at: http://www.lifesabundance.com/petfoods . Don’t forget to also clean out the ears with the ear cleaner and clean out eyes with a gentle rinse in the tub or wipe with a wet damp cloth. You may also need to pluck out any hair growing in the ears to keep it clean and dry in them. Once the dog has been thoroughly cleaned, dry him off with a towel and hair dryer. Simultaneously brush the dog’s coat and comb the hair.
The next few steps you may choose for your groomer to do:
2.Clip your Schnauzer. The process starts with the dog’s head. A No. 7 or 10 head can be used on the clippers or, alternatively, a pair of sheered scissors. When clipping I use a Oster Golden A5… If the clipper blades start to get hot turn them off for a while so you do not end up burning your pets skin. You can always stop and finish the clipping in 2 or 3 sessions… A Schnauzer should have hair on the face, brow and a goaty beard so be sure not to remove much hair from the face.
3.Trim the dog’s hair between the eyes in a inverted V so your dog can see but stay away from the rest of the face and brows. You want to cut those with sheers.
- Shave his front legs in a downward direction to the length you want. It is pretty much a Cocker cut and a skirt is left as well as hair on the legs, but the back and top of head is shaved short.
- Be sure to check the toenails and clip or trim when necessary. This is done with a dog nail trimmer, which you can purchase at any pet store. Place the nail trimmer under the dog’s nails, watching for where you see pink. Pink is the dogs blood vessels ,and you do not want to cut these. In dark dogs you may not see the pink so just cut the point off the nail and after a week do it again to get to the desired length. Squeeze the nail trimmers without twisting. Move on to the next nail until they are all trimmed. File your dog’s nails with a nail file if you think they are too sharp after trimming. Don’t forget to make sure you get the dew claw if your pup still has that nail to. Keeping your dogs nails short helps prevent any deformities associated with their paws.
- Teeth: all dog grooming should include brushing their teeth using dog toothbrush and dog dental products on an every other day bases, but at least once a week. You can also use a dental scraper to scrape off and descale any plaque on teeth.
- On Schnauzers, as they grow into teenagers from 5 mths to a year of age their coat may appear thin, this is just your puppy loosing his puppy coat, as an adult his coat will come in thick. They can also seem to have more of the red tone as pups but it tends to get blacker with age.
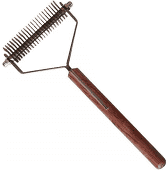
- Brushing with Coat king: Here is a pic of the coat king brush you may want to buy to keep on hand to give your Giant that lay down appearance you see on the back of show dogs without stripping the coat. It takes the undercoat out and gets rid of dead hairs that are just hanging on. It can also help get rid of reddish undercoat hairs as well as pesky white hairs. Keep in mind though you would not want to use this just before a conformation show since it can strip out that double coat that the judge is looking and feeling for in the ring. You can google search coat king Giant Schnauzer youtube video to see how the coat king is used. Get the double wide 23 or 30 blade coat king comb for a Giant Schnauzer.
Possible Ear infections: Repeated head shaking. Foul-smelling, waxy build-up. Red, painfully inflamed ears. What do all these things have in common? All are symptoms of otitis externa, or what is commonly referred to as ear infections. If you have ever groaned inwardly and felt dismay the moment your dog starts shaking his head or rubbing his ears along the nearest available surface, you’re not alone. Unfortunately, too many pet parents are more than familiar with this recurring medical problem. Often, it is accompanied by an offensive odor and one can only imagine how overwhelming the smell is to the suffering pup! Canine ear infections result from an overgrowth of yeast or bacteria in the ear canal, causing redness, irritation and a heavy accumulation of wax. Likely triggers of these maladies are skin reactions to inhaled allergens – like pollen, mold or dust mites – or food allergies and sensitivities. Be aware that both large ears and swimming predispose dogs to ear infections. Humans tend to develop ear infections as a result of viral infections, typically in infancy or early youth. As youngsters, our Eustachian tubes are very small. Respiratory congestion can lead to blockage of these canals, resulting in otitis media (a middle ear infection). Because the infection is internal, they frequently require oral antibiotics. In contrast, pets usually develop ear infections as adults, and the infection is almost always localized in the external portion of the ear. In most cases, the application of prescription drops or ointments directly into the ear canal usually resolves the illness. If you suspect your companion animal may be suffering from an ear infection, please seek veterinarian assistance for diagnosis and treatment. If necessary, your vet may prescribe a topical medicine and advise routine cleaning. Please read BLOG page on more info on other causes of ear issues.
EARS ARE NATURAL: but you want to tape them to make them the perfect triangle: SEE BOTTOM OF PAGE.
EAR CROPPING:
Do we offer ear crop? Yes we do. But I would prefer buyers to keep the ears natural, or do it after they receive the puppy.
Here is where I TRY to change your mind on ear cropping… Or at least talk you into doing it after you receive your puppy from us. I HATE putting the pups through it myself.
If you are on the fence about ear cropping please consider this: Ear crop is 100% cosmetic only and does not help with future ear infections or any other good reason for doing it. It is just you wanting a dog with a certain “LOOK”. There are a long list of negatives and here they are:
1. A pup can not get ears cropped until at least 6 to 7wks of age. So a bigger puppy getting half his ear chopped off. This can not be compared to a 3 day old pup getting dew claws and tail docked since a 3 day old pup is mostly loose joints and nerve system is not fully developed at that point so at 3 days much less pain, smaller area to cut, and quicker healing time and they do not stop eating. Most time they don’t even bleed at 3 days old. Not true with an older pup that is in lots of pain when vet cuts half his ear off, sutures it, and then it takes 3 wks to completely heal.
2. Healing Ears are itchy and painful and so your pup is going to try to scratch constantly and is susceptible to infection on the healing edge. You have to keep pup from getting the healing edge dirty which may mean covering the ears and changing the dressing every day until healed in a case where pup wont leave the ears alone. At our home we have to cage the pup by himself after surgery to keep ears from getting hurt or infected by other pups, so pup is all alone and that alone is just sad.
3. A pup that has had ears cropped is smaller at 8 wks of age when compared to sibling that was not put through a day with no food and then surgery which is causing a shock to pup’s system. This “shock” also lowers your pup’s immune system so leaves pup more susceptible to sickness, germs, bacteria, cocci, etc.., Pup can also contract a virus from the needed overnight stay at vet office for ear crop. Pup could die on the surgery table or have complications from surgery. It would still be your pup if that happens, so if vet bills from a reaction then it is your pup and a surgery you alone are responsible in choosing to do and take all risks involved. We do not refund or replace pup. You must pay IN FULL for your pup as soon as you choose the pup you want and any payment for a ear crop pup can not be with credit card or Paypal. You will be given your pup’s microchip number before surgery so you can be sure it is your pup at all times.
4. I will not board a pup with cropped ears because I am not the one that has chosen to put the pup through this pain, so you will receive your pup right after surgery and all post surgery care will be up to you. If pup can not get into our vet until close to or at 8 wks of age for the surgery then you will be handed a pup with sutures still in the ears. You or your vet will need to remove sutures 7 to 10 days after surgery. We do not take any responsibility in the look or care of your pup’s ears. The more you take care of the ears the better your results will be. IF YOU JUST WAIT AND GET IT DONE AT YOUR OWN LOCAL VET AFTER YOU RECEIVE YOUR PUP THEN YOUR VET WILL CARE FOR THE EARS, WHICH IS MUCH BETTER THAN YOU HAVING TO DO ALL AFTERCARE BY YOURSELF.
5. When everything is done perfect and you have been diligent with keeping ears posted for weeks or months you can still have an ear that just does not want to stand correctly. Which can be very frustrating and make you wish you never even had them cropped. So if undecided on ear cropping I say do yourself and your pup a favor and keep it natural.
We prefer not to crop if at all possible. I hate to be the one to put a pup through it so I prefer you get your pup and find your own vet to do it… but if you can not get it done locally our vet will do it. It costs $450 for us to get it done for you. Please read all pages on our website to learn everything you can about ear cropping and most importantly the guarantee page. Below are pics of different ear crop styles our vet has done. The vet chooses which is best for the ear he is cropping. If you have a look you want you can always send us photos for the vet but in the end the vet chooses which crop will stand easiest on the individual puppy’s ears he is cropping, and ear leather and age of pup is a factor in this. Most of the time the medium long crop is the one the vet will do. He does not do the extremely long crops that are horrible to get to stand. You can see our sire/dam page to see medium/long crops as all cropped adults on that page have the crop our vet usually does. He only does a short crop if asked to or if ear needs a short crop to have a chance of standing. If you want ears to stay natural in the event vet feels it has to have the shortest crop you will need to let me know before I take pup to vet for ear cropping. Once I drop pup off vet decides what is best for the puppy. Vet may also decide the ears on that pup are not croppable, and keep in mind it is still your puppy even if ears are not cropped.
Medium Long Crop, 95% of pups get this crop.
Another photo of a Medium Long Crop
Short to Medium crop, Done if Buyer wants or if shorter crop is needed.

Shortest ear crop. Done if Buyer wants or if vet feels ear will only stand if this short.
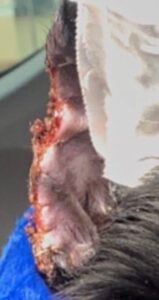
Pic of ear crop right before sutures were removed. This is what the ears may look like when you receive your pup if we recently had ears cropped for you and you will need to keep edge clean so no infection starts. We usually have sutures removed in time for puppy transfer but even if we do the edge may still be raw looking and still healing. If ears get cropped closer to 8 wks of age then sutures will still be in and removal by your vet will be needed.
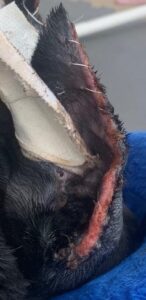
Here below is a scabby ear… sutures still in… You want to keep this scabbing from happening. So soak any scabs with wet paper towel and gently remove them. Keep ear edge free of scabs, you can put a thin layer of triple antibiotic ointment on the edge of ear. Scabs are breeding ground for infection so get rid of scabs but do so by soaking and gently taking off tiny bit at a time. Do not pull dry scab off or you may take good tissue with it and cause scars. A tiny bit of bleeding is normal when you take scabs off. Watch for any swelling and consult vet if chance of infection and he will prescribe an antibiotic if needed.
————-
EAR CROP CARE: I will not board a puppy that has newly cropped ears, dealing with newly cropped ears is stressful and I don’t want to deal with it.. So in most cases you will be dealing with wound care as the edge of ear heals for a few weeks after you receive your puppy. Some people do not post ears during healing… I personally will post them for a couple days and then take it down and wash and dry ear and allow to be untaped for a day or two and then put it back up again… So I am taking the bandages off every couple days to rest until all scabs are gone and ear is perfectly healed. If ears are standing I don’t post them at all until healed. Airing the ears out untaped really is the best way to heal the ear edge but to get the ear to stand, taping is needed… Again some choose to wait. If worried you can do what I do which is take down posting every 2 days until no scabs are left. then after it is healed all up you can keep the ears taped up for a week or more as long as it does not get wet. If it gets wet you have to retape it.
Ear Crop Care for healing ears after surgery, while sutures are still in:
Flush the incision at the base of the ear area with ear wash or peroxide from a dispenser or syringe and apply antibiotic ointment to the incisions two or three times daily. Avoid wetting any bandaging. Remove scabs that form on the ear incisions by soaking them and gently removing them with a paper towel, do not rip thick dry scabs off or you will cause bleeding and can pull off new skin, soak and gently remove, DAILY. Keep pup from scratching ears. If this means using a cone type collar, I would recommend trying the inflatable collars. Always make sure puppy can eat and drink with collar on! Make sure ears are completely dry if you need to use gauze or other cover up on healing ears. The tip of suture is left un-knotted because the ears grow so fast. If there is a knot then it grows into the tip of the ear. So we leave it un-knotted. This means extra care on your end that the suture does not get pulled out. Cover ear if needed. Usually as long as it has been a few days, it is still ok if suture gets pulled out since the skin attaches back together rather quickly, but a suture may need to be added if the skin pulls away and healing incision opens up. In most cases its just a numbing shot and then one or two quick stitches to close and no need for an actual surgery. Any additional vet visits for ear issues is completely up to the puppy buyer and is that persons responsibility to make sure ears are kept from infection or any other problems that may arise from ear crop of the puppy. Ear cropping is ONLY COSMETIC AND WAS CHOSEN BY PUPPY BUYER TO DO TO THEIR PUP. So all responsibility is on the puppy buyer for any issues related to ears and ear cropping. I would suggest massaging the ear when you apply the antibiotic ointment. No need to actually post the ears until sutures are removed. But you can post them daily if you want to, just make sure to keep edge free of any tape or glue you post with and change dressing everyday until ears are completely healed, and then you can post for longer periods of time.
———————————————————————-
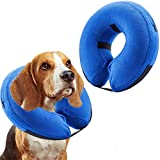
IF YOUR PUP STILL HAS EARS HEALING: Do not leave tape wrapped around any scabs or healing skin. Do not put glue on any sutures or healing skin. You can use the glue and tape but just make sure the glue does not get on the healing edge. Tape: You can cut the edge of the tape off of healing skin once glue dries in about an hour. This way the healing edge can be open to the air. You can also choose to leave tape on but have gauze between the tape and the healing skin to protect the healing tissue from the adhesive and to absorb natural moisture. If ears are still healing then ears have to be posted more often, (everyday), so the healing edge does not get infected. Moisture can cause infection. Before and after sutures are removed you should help loosen scabs by soaking in water and breaking apart a little at a time with your nails. Do not pull scabs that are not soaked first or that are very deep or you will pull healthy tissue along with it and create an indention in the ear. Use peroxide or ear wash to clean inside and outside of ears. You should massage the ears daily and massage real well in between postings as well as pulling the edge while massaging to help the edge looking its best. You can put a thin layer of antibiotic cream or ointment along edge of ear to protect it. If ears are newly cropped responsibility of the care of the wound is solely on the puppy buyer after transfer of puppy. Newly cropped ears are very easily infected because a pup can’t help but scratch the itchy sore ears. Within that first week post surgery the cropped ears may get swollen and red on edge. This does not always mean there is an infection present but if your vet wants to treat it as an infection and prescribes an antibiotic that is just fine. It is very common for the edge to get inflamed and or infected a little and it is nothing really to worry about, your vet can prescribe a cream or oral antibiotic. Best way to keep from infection is to Keep ears clean and dry. E-collar or cone collar to keep pup from scratching maybe needed. The inflatable type collars tend to do better than the cone collars while posting ears. Since the plastic cone collars tend to push the posted ears down.
How long until ears stand: On Cropped ears you will need to tape the ears for a while until the the cartilage grows to the desired form. The training might be as short as a couple weeks post cropping or as long as one year or more. No one can tell you how long taping is going to take, every pup is different. If you do not believe you have time in your daily schedule to re-apply lost ear supports than I suggest that you consider a puppy with natural ears. The goal is to leave supports in place for 5 to 7, or even up to 10 days, remove the supports and glue and allow the ears to air out for 1 day and then re-apply supports. This schedule should be kept up until the ears are standing correctly by themselves. After the puppy turns 4 ½ months old the ears may stand correctly for a longer period of time. Allow them to stand as long as possible on their own, if they begin to tip or fall you will again apply the ear training for 5 -7 days. Repeat as necessary. You may find that your dog’s ears have stood perfectly for several months, only to droop again at around 6-8 months old. Molars are probably beginning to erupt which can affect the sinus cavity and ear canals. If this happens, you will need to support the ears again using the same methods as you used previously. Sports tape is our personal preference. I must emphasize the importance of NEVER pulling any tape or material tightly around the ear-NEVER, EVER! What happens when you cut off the normal blood flow to an appendage? You really don’t want to find out! NEVER EVER stretch your tape or pull your tape when wrapping. Our photos show our method of pinching the tape to form a snug fit, this method will not restrict the blood flow to the top of the ear if done correctly. Below is how I do this and you are welcome to call me anytime if you want me to walk you through it. If you are local I can do it for you in person. You can go to the following video I found that has a good procedure for ear taping. The only difference is that we use bond glue and tape the ears more…. We also use a popsicle stick or more foam tubing to connect the posted ears together in the H shape. If you have just a ear tip that wants to bend then I would suggest a breathe right strip and the torbot prosthetic glue to just that ear tip to get it to stand up. Remeber the less balky you can make it the better. That is why we recommend the Hoytt quick brace system “linked above”, because it is less balky than the traditional taping method we show below.
UPDATE 11-9-14: I have tried out the ear taping kit made by Hoytt. It is called Quick Brace and it is really nice. I think it works better on younger pups than the older ones though. I would highly recommend this ear posting quick brace system to everyone. It doesn’t work for all pups but have had no issues when used from the very beginning. Here is a link to their site if you want to try their system but keep in mind you will be leaving my site so bookmark us now so You can come back to our site. Here is the Quick Brace site address:
https://hoytt.com/quick-brace-for-cropped-dogs-ears/quick-brace-how-to-order/
Traditional Taping method:
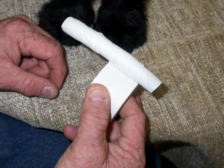
You will need: One 4oz can of Tobolt skin bonding glue, (can buy glue on ebay.com), One roll of 1.5″ sports tape, 1 roll of 1/2″ medical tape, One package of 5/8″ foam tubing caulk saver, (kind for windows), One roll of duct tape, 1 pack of foam sheet paper, (in the craft isle), popsicle sticks, and One bottle of skin safe glue dis-solvent such as Dissolve It or Goo Gone.
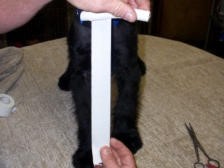
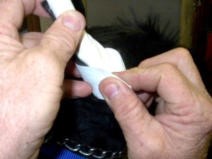
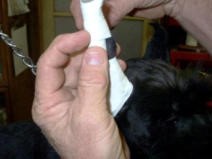
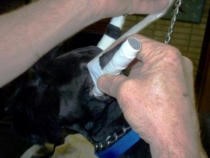
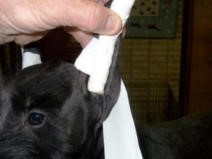
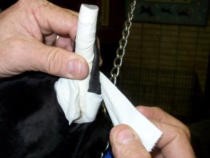
step 1: Cut foam tubing to length of ear and then wrap with sports tape. You can cut it a little long and cut away extra when all finished if desired. Your post is done unless you need to pop out the bases. For this you roll 1″strips of the foam sheet paper over the point where you want the bulge to be so that it pops the bases out. Tape over the bulge. This is needed if you notice the ear wanting to bend when post is put on. You want the skin to lie snug against the post so that is where you may need to add the bulge, (foam sheet paper strips), if needed. Usually the bulge will be 1/2″ from base of post and that still allows the base of the post to fit in the ear canal nicely. The bulge is not needed most of the time….
step 1a
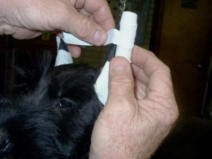
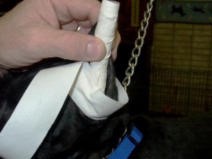
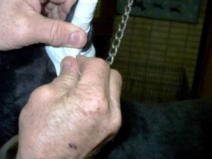
step 2: Before this step line all of inner ear and one side of foam tubing with bonding glue. Then place tube in ear and tape the base, being careful not to make tape to tight that it cuts off the circulation. Make sure that the ear skin is wrapped nicely around the tube without being bent at all.
step 3
step 4
step 5
step 6
step 7
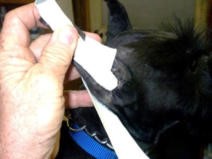
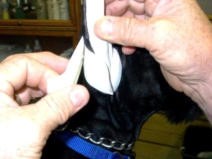
step 8 – Wrap tape at top of ear
step 9
step 10
step 11
step 12
step 13
step 14

step 15

step 16

step 17
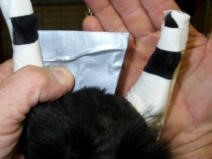
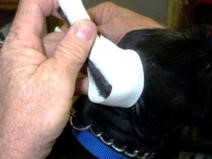
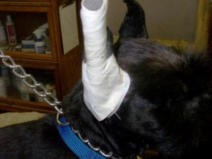
step 18 – Make sure ears are parallel and set evenly on both sides. Keep dog from pawing at ears as much as possible and keep dog close for at least 10 minutes until glue has set firm.
I sometimes will cut a long piece of tape and make a strap under pups neck from ear to ear if pup is getting the end of posts out of inside of ear.
You can use the glue dis-solvent to get any mess cleaned up and to clean off the ears in between taping. remember to give your dog a day off after 5 to 7 days of being taped to allow skin to breath. Than tape up again for another 5 – 7 days and keep doing this until the ears are set in place without any change when untaped. The longest you should ever go if you are extending the posted time is 10 days max posted and if it gets wet, smelly, or dirty u should change posting right away. Give dog a bath to remove any dis-solvent which is oily and smelly.
Here is a good type of collar you can try to keep pup from scratching at the posts: Its the inflatable type collar and you can find them on amazon or a pet store.
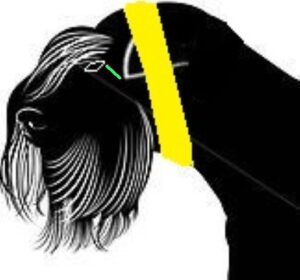
Ears Natural but you want to tape them to make them the perfect triangle: You can tape the ear like the following diagram. Make sure the eye corner aligns with tip of ear.
Call or Text: 9am 9pm CST, or (24 hrs if an emergency) 816-866-6104
Email: jordangiants@yahoo.com